Home automation¶
Bring a projectMM device into your smart home — controlled alongside your lights, scenes, and automations — using the MQTT module (or, for some hubs, the built-in WLED compatibility). The device exposes on/off, brightness, and color; a home-automation platform adopts it and drives those from its own app, voice assistant, and automations.
Integration goes both directions, and this page covers both:
- Your smart home controlling the device — a hub (Home Assistant, Homebridge, …) adopts the projectMM device and drives its on/off, brightness, and color from its own app, voice assistant, and automations.
- The device controlling smart-home lights — projectMM drives Philips Hue bulbs as effect pixels, so your existing smart bulbs become part of a show.
The device-side recipes below assume the hub and (where relevant) an MQTT broker are already running. If any of that infrastructure isn't there yet, jump to Set up the infrastructure at the end for HA-with-Mosquitto and standalone-Homebridge walkthroughs, then come back.
- Adopt in Home Assistant — point the device at HA's broker; HA auto-creates the entity. Optionally bridge that entity into Apple Home via HA's HomeKit Bridge.
- Adopt in Homebridge — standalone Apple-Home-only path when HA isn't wanted: add one
mqttthingaccessory, pair in Home. - Drive Hue lights — point an effect at your Hue bulbs.
- Other platforms — Node-RED, openHAB, and other MQTT hubs reach the device through the same topics.
The control surface these integrations drive — the MQTT controls, topics, and accessory config — is documented once in Core › System › MQTT; this page is the setup, and links there for the reference.
Prerequisites¶
- A projectMM device on your WiFi/Ethernet. For the MQTT-based paths (HA MQTT-discovery, Homebridge) the MQTT module must be present (it ships on boards whose catalog entry includes it; the Shelly model does); for the WLED-only HA path it isn't needed — HA reaches the device over its always-present
/jsonendpoint. - The device's MAC suffix — the last 6 hex of its MAC, which is its stable topic id on MQTT (
projectMM/<suffix>) and identifies the device to HA on the WLED path too. Read it from the MQTT module'smqtt_status, or once the device is talking to the broker,mosquitto_sub -t 'projectMM/#'. The examples below use563cfe; substitute yours. - A running hub — with per-path infra:
- HA + Mosquitto broker add-on — for MQTT auto-discovery (richer state + HomeKit Bridge). Set up HA + Mosquitto.
- HA alone (no broker) — for the WLED-integration path. Same HA install, just skip the Mosquitto add-on.
- Homebridge + a Mosquitto broker — for the standalone Apple-Home-only path. Set up standalone Homebridge + Mosquitto.
Adopt in Home Assistant¶
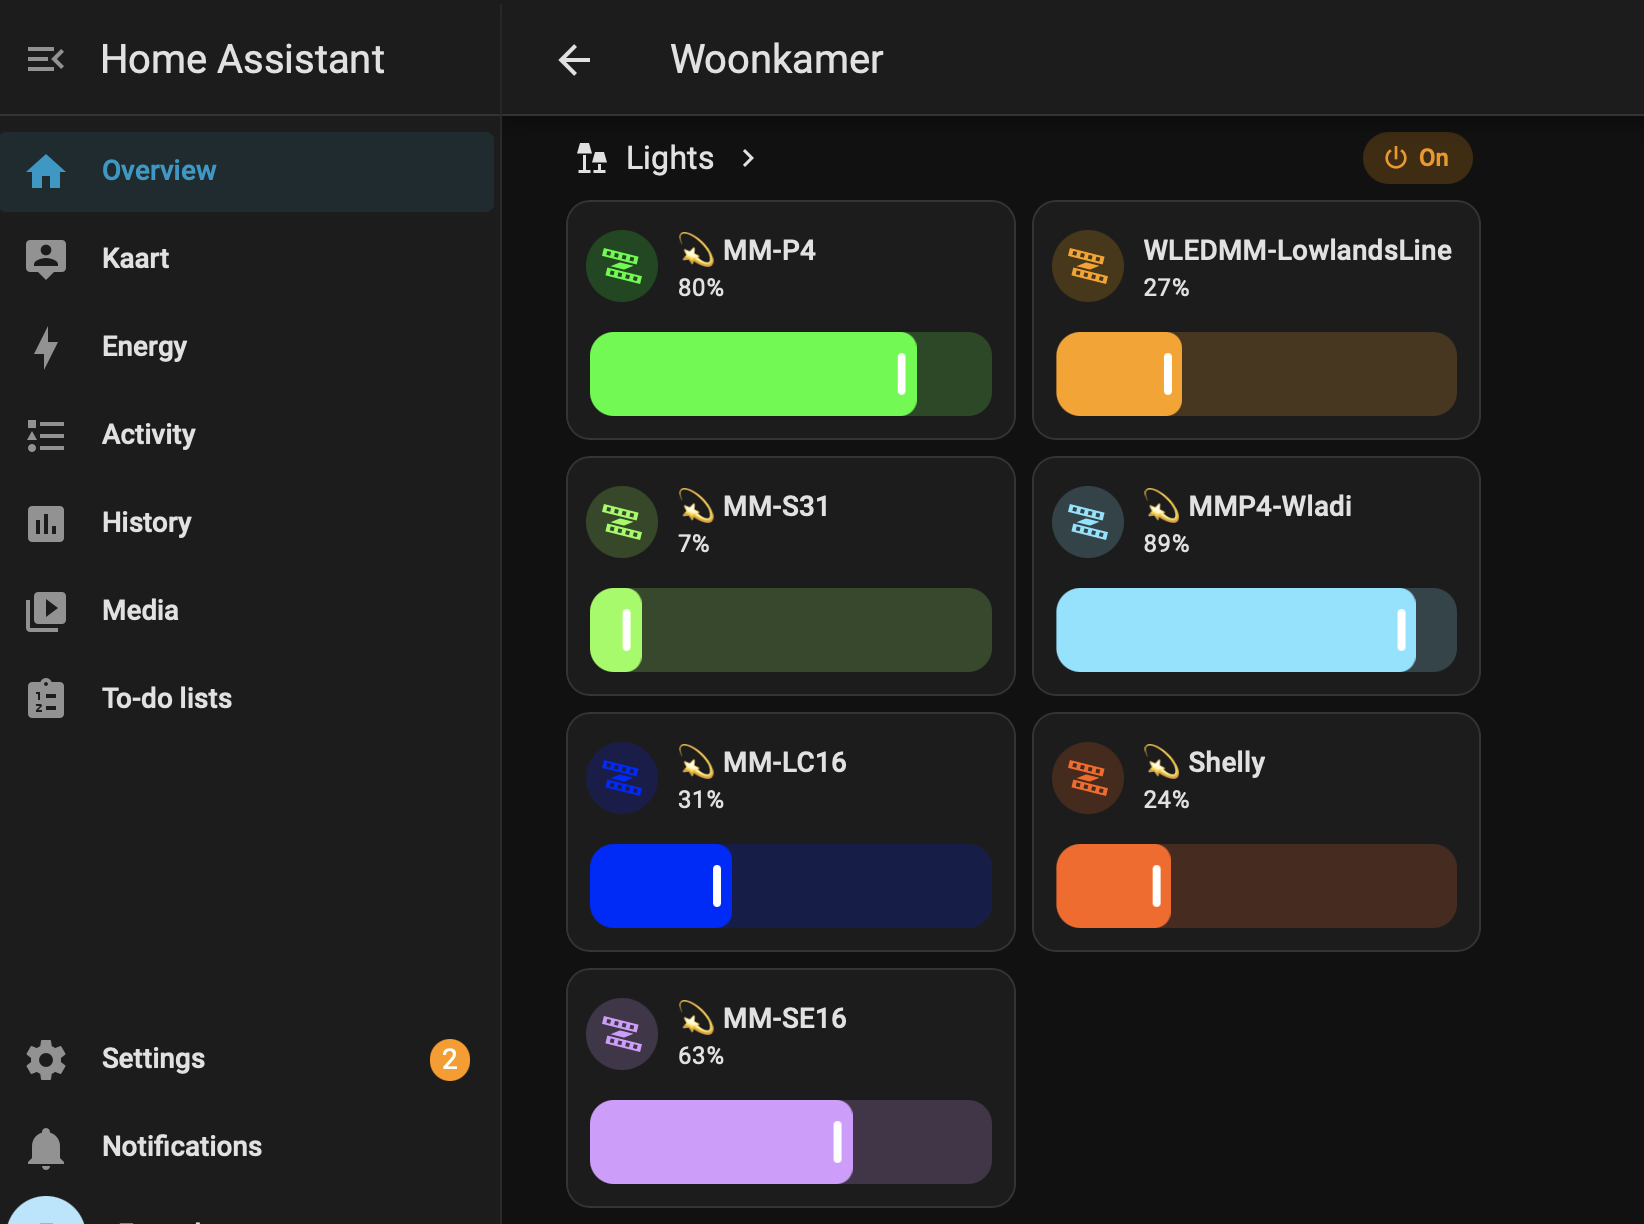
HA discovers a projectMM device automatically over the WLED path — no broker, nothing to configure — and lists it as a light with color, palette, and brightness. The 💫 in each name marks it as projectMM among any plain WLED devices. An optional step brings that entity into Apple Home via HA's own HomeKit Bridge — no Homebridge needed. Turn the haDiscovery control on only for the MQTT path (broker-only or cross-subnet setups); see Let HA auto-create the entity below.
The chain:
Apple Home ──HAP──▶ HA (HomeKit Bridge) ──MQTT──▶ Mosquitto ◀──MQTT── projectMM device
                             └── HA app / voice / automations
1. (MQTT path only) Point the device at the broker¶
The default WLED path needs none of this — skip to step 2. Do step 1 only if you're using the opt-in MQTT path (a broker-only / cross-subnet setup). In the device's web UI, open the MQTT module and set:
broker— the HA VM's LAN IP (not127.0.0.1; nothomeassistant.localunless the device does mDNS — safer to use the IP the HAOS console prints).port—1883.username/password— the HA user you created for MQTT (a plain HA user with local-network access; see the broker add-on setup if you haven't).haDiscovery— turn on (it's off by default). This is what makes HA auto-create the MQTT entity in the next step; leave it off if you're on the WLED path.
mqtt_status turns to connected when it reaches the broker. Confirm from HA with the built-in MQTT integration → Configure → Listen to topic → projectMM/# — the device's .../on/get, .../brightness/get, .../hsv/get, and retained .../name appear.
2. Let HA auto-create the entity¶
Nothing to configure — HA discovers the device automatically over the WLED path. Two paths exist; the WLED one is the default and the richer of the two, so a device appears in HA once out of the box:
- WLED integration (the default, no MQTT at all): HA's built-in WLED integration discovers the device over zeroconf and reads the WLED-compatible
/jsonAPI projectMM already serves — color, palette, brightness, and diagnostic sensors, no broker. This is the recommended path. - MQTT auto-discovery (opt-in, uses the Mosquitto add-on): turn
haDiscoveryon for a broker-only or cross-subnet setup where zeroconf can't reach HA. The device then also announces itself on the retainedhomeassistant/light/…/configtopic, and HA auto-creates a light entity named after the device with on/off + brightness (the discovery config declaresbrightnessonly, so this entity has no color control); it greys out when the device drops offline. Color/palette control stays on the separatehsv/settopic — not the auto-created entity.
Why is MQTT discovery off by default? Because the WLED path alone already gives HA a richer light — color, palette, sensors — with zero infrastructure, and running both lists the device twice (one WLED entity, one MQTT entity). So WLED is the default and MQTT discovery is opt-in, reserved for what WLED's zeroconf can't do: reach across VLANs/guest nets or a broker-only network, sit next to other MQTT devices (Tasmota, ESPHome, Zigbee2MQTT) under one convention, or push state with retained-across-offline latency. On a flat LAN with only projectMM devices, WLED alone is the whole story; a segmented network or an existing MQTT estate is where turning haDiscovery on earns its slot. The full rationale is ADR-0012.
The MQTT control surface (topics, HSV → palette mapping, retained state) is in Core › System › MQTT; nothing here restates it.
Not this: do not hand-configure HA's generic MQTT light against homeassistant/light/<slug>/… — that's HA's own discovery topic schema, not a control API. The device answers via the auto-discovery above.
3. Optional: expose to Apple Home via HomeKit Bridge¶
HA can act as its own HomeKit bridge. Settings → Devices & Services → Add Integration → HomeKit Bridge, pick Include selected entities, and tick the projectMM light entity created above. HA prints a QR code and PIN; in the iOS Home app, Add Accessory → More options → HA HomeKit Bridge and scan / enter the PIN. The light shows up as a HomeKit accessory driven end-to-end through HA — same outcome as the standalone Homebridge recipe, one fewer service to run.
Adopt in Homebridge¶
Standalone Apple-Home-only path, for when HA isn't wanted. Assumes Homebridge + a Mosquitto broker are already running (both together on a Pi is the usual permanent setup; a Mac or PC works for a quick test — see Set up standalone Homebridge + Mosquitto below if not). Two steps: point the device at the broker, then add one accessory to Homebridge.
1. Point the device at the broker¶
In the device's web UI, open the MQTT module and set:
broker— the broker's hostname or LAN IP (not127.0.0.1, which is loopback on the broker's host, unreachable from the device). Find it withhostname -I(Pi/Linux),ipconfig getifaddr en0(macOS), oripconfig(Windows).port— usually1883.username/password— only if your broker requires auth.
mqtt_status turns to connected once it reaches the broker, and mosquitto_sub -t 'projectMM/#' -v shows the device's .../on/get, .../brightness/get, .../hsv/get, and retained .../name.
2. Add the accessory to Homebridge¶
Install the homebridge-mqttthing plugin (Config UI Plugins screen, or npm i -g homebridge-mqttthing), then add the lightbulb accessory block from Core › System › MQTT § Homebridge to your Homebridge config — via the Config UI Config editor, or ~/.homebridge/config.json for a CLI install. Set:
url—mqtt://<broker>:1883. When Homebridge and the broker share a host (the usual case),mqtt://127.0.0.1:1883works, since here loopback is the broker.563cfe— replaced by your device's MAC suffix throughout thetopics.username/password— matching the broker, or removed if none.
Restart Homebridge.
3. Pair it in Apple Home¶
Once the broker, device, and Homebridge are all talking (the mosquitto_sub window shows the device, and Homebridge lists the accessory), add it to HomeKit: in the Home app, Add Accessory → More options → the Homebridge bridge, using the PIN Homebridge prints on start (or shown in the Config UI). The device shows up as a light — on/off, brightness, and the color wheel that steps through palettes.
Drive Hue lights¶
The other direction: instead of a hub controlling the device, the device controls your Philips Hue bulbs, treating each color bulb as a pixel of an effect. Your existing smart lights join the show — an effect's colors glide across them alongside (or instead of) an LED strip. This is a projectMM output driver, not a hub integration, so there's no broker and no Homebridge — the device talks straight to the Hue bridge over its LAN HTTP API.
Because Hue is a rate-limited HTTP hub (~10 commands/s), this is smooth ambient color, not fast strobing — the driver paces itself to the bridge and lets it fade between colors. Full behaviour, controls, and the wire contract are in the driver reference: Drivers › Hue.
Recommended layout: set up a one-dimensional grid — width 1, height = the number of Hue lights you want to control. Each pixel of that column maps to one bulb (the driver assigns window pixels to bulbs in order), so a 1×N grid gives you exactly N discrete lights with no wasted pixels, and 1D effects (rainbow, chase, …) read naturally across the bulbs. Sizing the grid to your bulb count keeps the effect and the driver in step.
To set it up:
- Add a Hue driver. In the device's web UI pipeline, add a Hue driver to the top-level Drivers container. Enter your bridge's IP in
bridgeIp(find it in the Hue app, or at discovery.meethue.com). - Pair with the bridge. Press the physical link button on the Hue bridge, then click the driver's
pairbutton within ~30 seconds. The device claims an app key (stored on the driver asappKey) — a one-time step; the status line reportspaired, N lights. - Pick what it drives. The driver lists the bridge's color-capable, reachable bulbs and its rooms; use the
room/lightcontrols to aim the effect at all bulbs, one room, or a single light. Each selected bulb becomes one pixel of the driver's window. - Run an effect. Any effect on the layer now drives the bulbs — the global brightness slider and color-order correction apply to them just like a physical strip (brightness 0 turns a bulb off).
Note: a bulb is only driven if it's an "Extended color light" and currently reachable — a white-only bulb, a plug, or a powered-off light is skipped. For true real-time (fast) Hue, the Hue Entertainment API (DTLS streaming) is out of scope for this driver, which targets the standard API's ambient-color sweet spot.
Other platforms¶
Home Assistant and Homebridge above are the worked examples; other home-automation platforms adopt the same device through the same primitives. The building blocks are shared — the MQTT control surface (broker + the on/brightness/hsv topics) and, for hubs that speak it, the device's WLED compatibility — so a new integration is a new front-end on top, not new device work.
Node-RED, openHAB, voice assistants via a hub, … — anything that speaks MQTT drives the device through the control topics; the broker setup is the same Mosquitto install at the end of this page, only the consumer differs.
Each integration is a self-contained recipe; the shared MQTT reference lives once in Core › System › MQTT.
Set up the infrastructure¶
The two recipes above assume the hub + broker are running. Here's how to install them if not — one section for Home Assistant + Mosquitto (the recommended path — richer control surface, HomeKit bridge included) and one for standalone Homebridge + Mosquitto (Apple-Home-only, no HA).
Set up Home Assistant + Mosquitto¶
Two pieces: Home Assistant Operating System (HAOS) in a VM, then the Mosquitto broker add-on installed from HA's Add-on Store.
Wired Ethernet on the host is strongly recommended. WiFi-bridged VMs work in theory but tend to disconnect for a few seconds every few minutes when the bridge re-associates; the device on the LAN sees the broker vanish and reconnect on the same cadence, which surfaces as entities flapping to "unavailable" in HA. A wired external switch on Hyper-V (or ProxMox / ESXi) is stable indefinitely.
Install HAOS¶
The recommended install is HAOS in a VM — it's the only image that supports the Add-on Store (Mosquitto and its friends install with one click there). Container / core installs work, but every add-on becomes a separate docker run. Below is the Hyper-V route on Windows; on other hosts follow the equivalent official page (any of ProxMox, ESXi, KVM, VirtualBox, or a Raspberry Pi 4/5 for a dedicated box — installation.home-assistant.io has the current image for each).
Windows: Hyper-V
Windows 10/11 Pro or Enterprise ships Hyper-V; the Home editions don't. Confirm with systeminfo | findstr /I "Hyper-V" — Hyper-V lines that end in Yes mean the CPU supports it and BIOS virtualization is on.
- Enable the feature. Open Turn Windows features on or off and tick Hyper-V (both sub-items). Reboot when it prompts.
- Download the HAOS Hyper-V image. Home Assistant OS releases — grab the
haos_ova-*.vhdx.zipfor Hyper-V and unzip it somewhere you'll keep the VM disk (e.g.C:\Hyper-V\HAOS\). - Create an external virtual switch on your Ethernet. In Hyper-V Manager → Virtual Switch Manager, add a New virtual switch → External, bind it to the Ethernet adapter, and untick Allow management operating system to share. This puts the VM directly on the LAN with its own DHCP lease — HA and the device see each other with no NAT.
- Create the VM. Hyper-V Manager → New → Virtual Machine. Name it
HomeAssistant; Generation 2; assign at least 2 GB RAM (2 GB is fine for a home LAN, 4 GB is comfortable); attach the network to the external switch you just made; Use an existing virtual hard disk and point at the unzipped.vhdx; finish. - Disable Secure Boot. Right-click the new VM → Settings → Security → untick Enable Secure Boot (HAOS's shim isn't in the Microsoft template).
- Start the VM. It boots to a text console — wait ~2 minutes for the first-run "Preparing Home Assistant" to finish. When the console shows
homeassistant login:, open a browser on the host at http://homeassistant.local:8123 (or the LAN IP the console prints) and complete the onboarding wizard. - Keep the host awake and the VM auto-managed. An always-on HA host must not sleep — an S3 or hibernate suspend pauses Hyper-V, and every projectMM device / HA entity flips to "unavailable" until it wakes. In an admin PowerShell:
# what sleep states this host actually supports (tells you what to disable)
powercfg /a
# never sleep on AC (the common case — S3 is what most desktops/laptops have)
powercfg /change standby-timeout-ac 0
# hibernate off — also disables Hybrid Sleep + Fast Startup, which chain off it
powercfg /hibernate off
Modern-standby (S0 Low Power Idle) hosts still respect standby-timeout-ac 0, so the same command covers both. If it's a laptop, close-lid also has to stop sending the sleep signal:
Then in Hyper-V Manager → HomeAssistant → Settings → Management: - Automatic Start Action → Always start this virtual machine automatically (Startup delay 60s so the vSwitch is up first). Windows reboots → HA is back without touching Hyper-V Manager. - Automatic Stop Action → Save the virtual machine state. A planned shutdown suspends HA cleanly and resumes it on next boot, avoiding a cold-start with the SQLite in an uncertain state.
- Optional cleanup: if VirtualBox was running a previous HA VM, disable its
VBoxSVCautostart from Task Manager → Startup. VirtualBox's WiFi-bridge driver is the flapping cause noted above, so leaving it off keeps latency low.
Install the Mosquitto broker add-on¶
In HA, Settings → Add-ons → Add-on Store → Mosquitto broker → Install, then Start. Turn on Start on boot and Watchdog.
The add-on runs an MQTT 3.1.1 broker on the HA VM at <HA-IP>:1883. It uses HA users as MQTT credentials: create a dedicated user for the device (Settings → People → Users → Add user; name it e.g. mqttuser, tick Can only log in from the local network, set a password), and MQTT clients then authenticate with that user's credentials. No mosquitto.conf editing.
The Mosquitto add-on and the MQTT integration are separate: the add-on runs the broker; the integration is HA's client to it. HA usually auto-adds the MQTT integration on first add-on start; if not, Settings → Devices & Services → Add Integration → MQTT, host core-mosquitto, port 1883, use the user credentials.
Optional: reach a USB Zigbee coordinator from the VM¶
Only relevant if you also run Zigbee devices. Hyper-V has no USB passthrough, so a Zigbee coordinator plugged into the Windows host cannot be handed to the HAOS VM the way it can on ProxMox or on a bare-metal Pi. The standard answer is to expose the coordinator's serial port over the network and point Zigbee2MQTT at that instead of at a COM port.
Run a serial-to-TCP bridge on the host: it opens the COM port, listens on a TCP port, and copies bytes both ways. ser2net does this on Linux; on Windows a small pyserial script is enough. Whatever you use, it has to accept one client at a time (a Zigbee coordinator is single-consumer), run 115200 8N1 with no flow control, and log the bytes moved in each direction per connection. That last one is not a nicety: it is what makes the failure below diagnosable at all.
Then in the Zigbee2MQTT add-on configuration, replace the serial port with the host's LAN address:
serial:
  port: tcp://<host-lan-ip>:20108
  adapter: zstack        # match the coordinator: zstack for CC2652/CC2531, ember for EFR32
  baudrate: 115200
Run the bridge as a service, or a host reboot leaves Home Assistant with no Zigbee at all. NSSM wraps any executable as a Windows service:
nssm install ZigbeeBridge "C:\zigbee-bridge\.venv\Scripts\python.exe" "-u C:\zigbee-bridge\serial_tcp_bridge.py --port COM9 --tcp 20108"
nssm set ZigbeeBridge AppDirectory "C:\zigbee-bridge"
nssm set ZigbeeBridge AppStdout "C:\zigbee-bridge\bridge.log"
nssm set ZigbeeBridge AppStderr "C:\zigbee-bridge\bridge.log"
nssm set ZigbeeBridge AppRotateFiles 1
nssm set ZigbeeBridge AppExit Default Restart
nssm set ZigbeeBridge Start SERVICE_AUTO_START
AppExit Default Restart earns its place at boot: if the service starts before the USB device has enumerated, the bridge exits and NSSM retries until the port appears.
Turn off USB selective suspend. Windows powers down an idle USB port by default, and a Zigbee coordinator between messages looks idle. The device stays enumerated and the COM port stays open, so nothing anywhere reports an error; the coordinator just stops answering. Both controls have to be cleared, the power plan and the per-hub checkbox:
powercfg /setacvalueindex SCHEME_CURRENT 2a737441-1930-4402-8d77-b2bebba308a3 48e6b7a6-50f5-4782-a5d4-53bb8f07e226 0
powercfg /setdcvalueindex SCHEME_CURRENT 2a737441-1930-4402-8d77-b2bebba308a3 48e6b7a6-50f5-4782-a5d4-53bb8f07e226 0
powercfg /setactive SCHEME_CURRENT
Get-CimInstance -Namespace root\wmi -ClassName MSPower_DeviceEnable |
  Where-Object { $_.InstanceName -match 'ROOT_HUB' } |
  ForEach-Object { $_.Enable = $false; Set-CimInstance -InputObject $_ }
The powercfg /hibernate off in step 7 above matters here too, because it also disables Fast Startup. With Fast Startup on, Shut down resumes a saved kernel session rather than cold-booting, so it does not power-cycle a wedged coordinator. Restart does.
Now jump back to Adopt in Home Assistant.
Set up standalone Homebridge + Mosquitto¶
For an Apple-Home-only setup without HA. A Raspberry Pi is the natural permanent home (services survive a reboot); a Mac or PC is fine for a throwaway test.
Wherever the broker runs, the device reaches it over the LAN, so the broker must listen on all interfaces, not just loopback — noted per platform below. Confirm the broker sees the device at any point with:
Raspberry Pi¶
On Raspberry Pi OS (or any Debian-based distro):
The package starts a mosquitto systemd service. Mosquitto 2.x listens only on localhost by default, so open the LAN listener with a drop-in config — create /etc/mosquitto/conf.d/projectmm.conf containing:
then sudo systemctl restart mosquitto. (allow_anonymous true is fine for a home LAN; add a password file if the broker is exposed more widely.)
Install Homebridge via the official Debian repository (the apt-package guide) — it runs as a systemd service with the Config UI at http://<pi-ip>:8581. Both services persist across reboots by default (sudo systemctl enable mosquitto homebridge to be explicit), which is what makes a Pi the right permanent host.
macOS¶
Mosquitto 2.x binds only to localhost by default, so open the LAN listener with a one-line config (test.conf with listener 1883 0.0.0.0 and allow_anonymous true), then run it in the foreground so you see every packet (Ctrl-C to stop):
brew install mosquitto
printf 'listener 1883 0.0.0.0\nallow_anonymous true\n' > test.conf
"$(brew --prefix)/sbin/mosquitto" -v -c test.conf
Now the device reaches the broker at your Mac's LAN IP while Homebridge reaches it on loopback. (Allow mosquitto through the macOS firewall on 1883 if prompted.)
Install Homebridge (homebridge.io has the macOS installer; npm i -g homebridge homebridge-config-ui-x is the CLI route). Start it with homebridge in a terminal, or via the menu-bar app.
Tearing it down: Ctrl-C the foreground mosquitto and quit Homebridge — nothing persists as a service.
Windows¶
The installer registers a Windows service and installs the tools under C:\Program Files\mosquitto\. For a test, stop the service and run it in the foreground — Mosquitto 2.x binds only to localhost unless told otherwise, so pass a one-line config that opens the LAN listener (create test.conf with listener 1883 0.0.0.0 and allow_anonymous true):
Allow mosquitto.exe through Windows Defender Firewall on 1883 the first time (accept the prompt, or add an inbound rule for TCP 1883).
Install Homebridge for Windows (the official installer) — it runs as a service with the Config UI at http://localhost:8581.
Tearing it down: Ctrl-C the foreground mosquitto (leave the broker service stopped, or disable it in Services); stop the Homebridge service from the Config UI or Services.
Now jump back to Adopt in Homebridge.
Troubleshooting¶
mqtt_statusstuck onconnecting— the device can't reach the broker. Check the broker IP is your computer's LAN IP (not127.0.0.1, which the device can't route to), that the broker is actually listening on all interfaces (on Windows standalone Mosquitto, thelistener 1883 0.0.0.0line above; the HA Mosquitto add-on already listens on all interfaces), and that the firewall isn't blocking1883.- HA entities flap "unavailable" every few minutes — the VM's network is dropping. Almost always the WiFi-bridge symptom noted in the HA install section: the HA VM is on a WiFi-bridged NIC that re-associates periodically. Move the HA VM to a wired external switch (Hyper-V / ProxMox / ESXi all support this), or run HAOS on a wired Pi. This is also what a battery of Zigbee / Wi-Fi routers with a bad channel plan looks like — worth checking the HA host's own connectivity first.
- Every Zigbee entity is
unavailableand Zigbee2MQTT will not start: work down the chain instead of restarting things. Ifbinary_sensor.zigbee2mqtt_bridge_connection_statereadsoffrather thanunavailable, MQTT is healthy and Home Assistant is receiving Zigbee2MQTT's own offline message, so neither the broker nor the integration is at fault. On a network coordinator (see reach a USB Zigbee coordinator from the VM), read the bridge's log next: a connection logged asto-serial 16 B / from-serial 0 Bmeans the bridge faithfully wrote Zigbee2MQTT's init and the coordinator answered nothing. That is a hung coordinator, not a software fault, and restarting the add-on, the bridge, or Windows will not clear it. Unplug the coordinator, wait ten seconds, plug it back in, then restart the bridge service withRestart-Service ZigbeeBridge -Forcefrom an elevated PowerShell. That last step is not optional: a bridge that opens its serial port once at startup is still holding a handle to the device that was unplugged, and it will keep failing every connection until it is restarted. Then restart the Zigbee2MQTT add-on as well. While the bridge was unreachable the add-on will have failed its own adapter initialization and dropped into an error state, and its watchdog does not reliably bring it back, so it sits there stopped even once the bridge is healthy again. Turning off USB selective suspend is what stops the whole sequence recurring. - Devices report briefly after each Zigbee2MQTT restart, then go quiet, and commands never arrive: a different fault from the one above, and the one most often misread as a software problem. The coordinator powers up, starts its network, and then loses power again a short while later, typically once its radio begins transmitting. It stays enumerated as a serial port the whole time and still answers simple queries, so nothing in the operating system, the bridge or Zigbee2MQTT reports an error. The only visible symptom is that incoming reports stop and every outgoing command fails. Move the coordinator to a different USB socket, or onto a powered hub that supplies its own current, before considering a re-flash. Moving it counts as an unplug, so restart the bridge service and then the add-on afterwards, exactly as above, or the bridge keeps serving a handle to the socket the coordinator just left and nothing appears to improve. A socket whose power delivery has degraded can no longer hold a transmitting radio up, and that is far more common than a corrupted coordinator. If the devices then keep their pairings and the mesh reforms on its own, nothing was ever corrupted, which is also the sign that re-flashing would have been wasted effort.
- HA created two light entities with the same slug (
light.<slug>_<slug>) — a stale MQTT-discovery config is still retained on the broker. Delete the retained topic (mosquitto_pub -h <broker> -t 'homeassistant/light/projectMM_<mac6>/config' -r -n) and let the device republish; HA cleans up the entity within a few seconds. - HA WLED integration fails with "Cannot connect", or the entity shows partial state — HA reads two endpoints, both on the device's HTTP port (default 80 on ESP32, 8080 on desktop builds), so probe both:
curl http://<device-ip>/json           # full {state, info, effects, palettes}
curl http://<device-ip>/presets.json   # `{"0":{}}` — truthy-empty is correct
A 404 on /json means an old firmware that predates the WLED-compatibility shim → reflash. A 404 on /presets.json with /json working means the presets route is missing → HA's coordinator retry-storms trying to fetch presets and the entity ends up stuck on "unavailable" even though the light responds; also a firmware reflash. A /json response that parses but is missing info.fs, state.nl, state.udpn, or state.lor fails python-wled's dataclass parse and HA reports HTTP-500 on light.turn_on — again a firmware version older than the current WLED shim.
- Homebridge shows "No Response" — the accessory's topics don't match the device's MAC suffix, or the url points at the wrong broker. Confirm the suffix with mosquitto_sub -t 'projectMM/#' and that the same broker appears in both the device's broker control and the accessory url.
- HomeKit color wheel doesn't match a specific color — expected: HomeKit sends a full-precision hue, and the device snaps it to the nearest built-in palette (there's no arbitrary-color mode). Same behaviour whether the bridge is HA's HomeKit Bridge or standalone Homebridge. See the palette note in the MQTT reference.