Installing projectMM on a desktop¶
projectMM does not need an ESP32. The same code runs as an ordinary application on your computer, rendering effects, serving the web UI, and driving Art-Net, DMX and LED panel cards over the network. It is the quickest way to see projectMM working, and on a real PC the effects have far more compute behind them than any microcontroller can offer.
This page covers Windows. For macOS and Linux, the README has the download and first-run steps.
Looking to flash a device instead? That is Install & first light. This page is about running projectMM on the computer itself.
Five steps, one of which is Windows asking whether you trust an unsigned application. That is not a fault, and it is covered below.
1. Download it¶
Open the web installer and set Install to to This computer (Windows x64). The Release picker offers stable releases and latest, a build published on every merge to main; pick a stable one unless you want the newest unreleased changes.
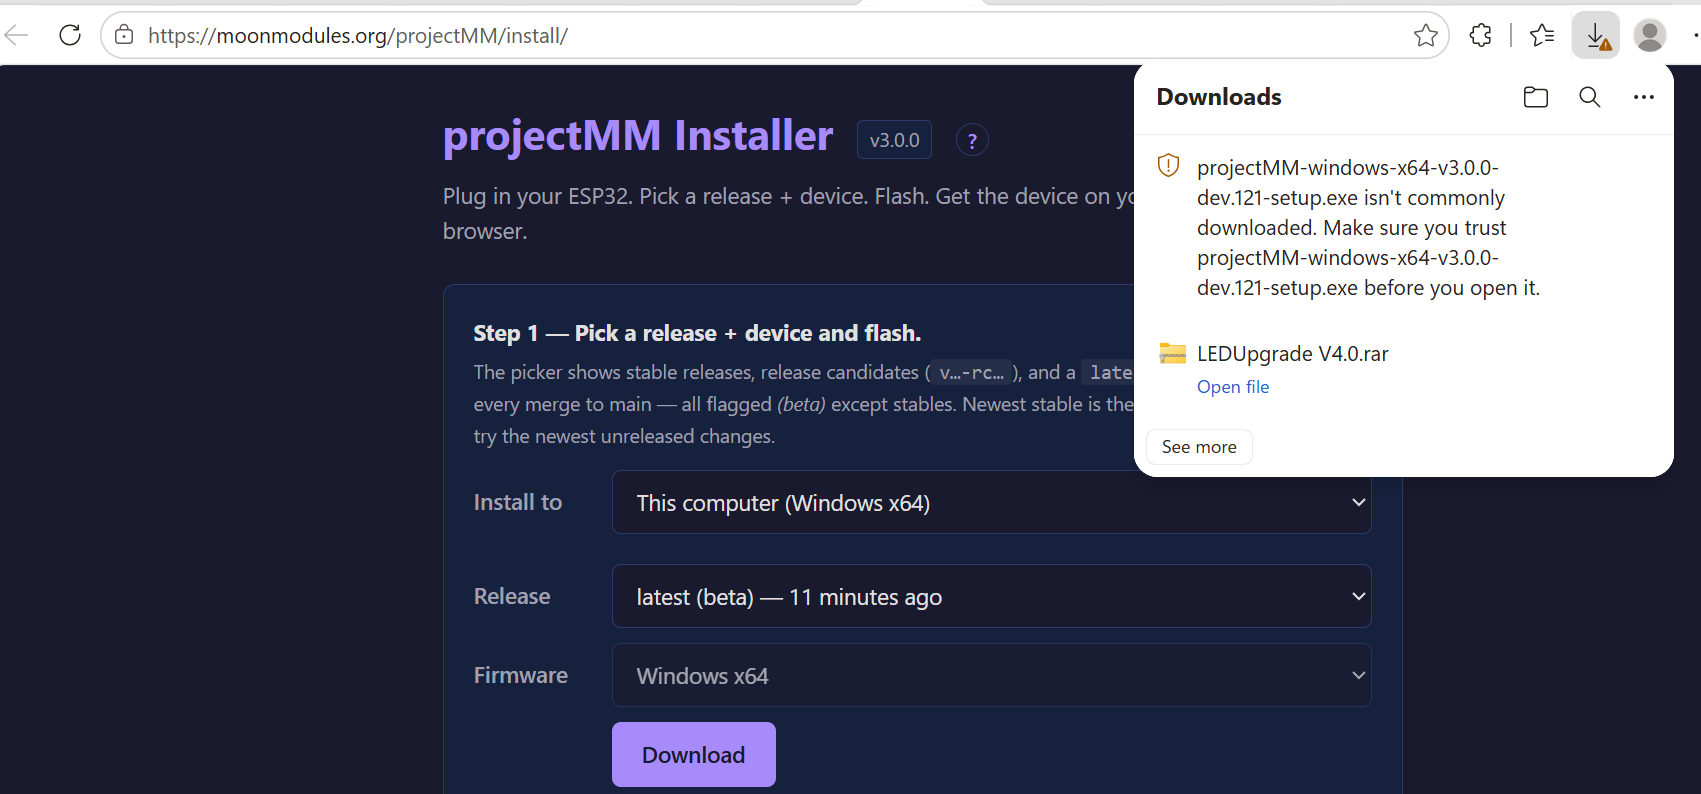
Download gives you projectMM-windows-x64-vX.Y.Z-setup.exe.
Your browser will most likely flag it straight away: "isn't commonly downloaded. Make sure you trust … before you open it." That is step 2, and it is expected.
2. Tell the browser to keep it¶
Microsoft Defender SmartScreen judges a download by its reputation, built from how many people have downloaded that exact file from a publisher it recognises. projectMM is not code-signed, and every build produces a brand-new file, so its reputation is always zero. The warning is about the certificate, not about the contents.
In the Downloads panel, click the ⋯ next to the file, then open the Delete dropdown and choose Keep anyway:
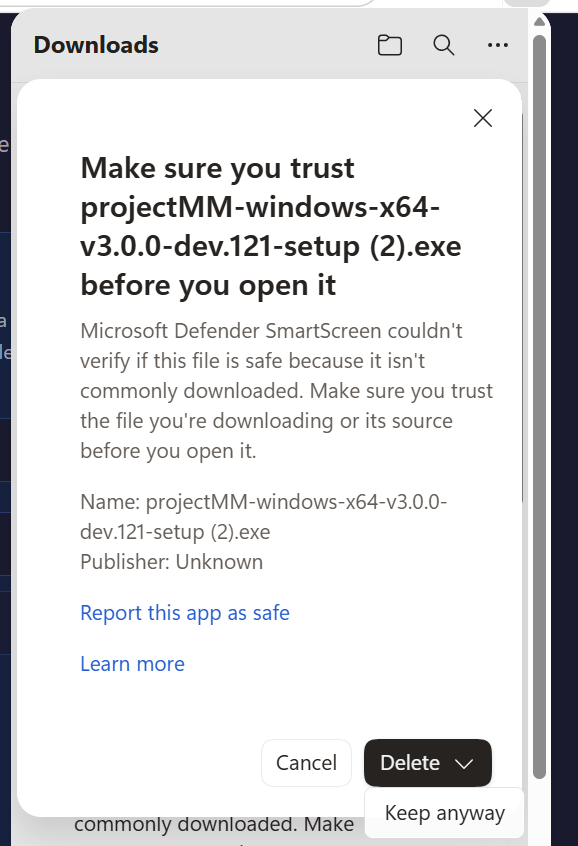
Chrome puts the same choice behind the download entry's ⋯, then Keep and Keep anyway.
Worth knowing so it does not surprise you later: this happens for every new build. Reputation attaches to a file, not to a project, so a fresh latest build starts from nothing again. Only code signing changes that, and it is on the backlog.
If Defender quarantines it as a trojan¶
Occasionally Defender goes a step further and removes the file outright, naming something like Trojan:Win32/Wacatac.C!ml. The !ml suffix means a machine-learning guess, not a match against known malware: an unsigned, zero-reputation executable that opens audio capture devices (the Audio module records from your microphone or a loopback device) fits a pattern the model weighs, and every new build is a brand-new fingerprint for it to judge. The contents are checkable rather than a matter of trust: the binary is compiled from this repository's source in public CI, and the one vendored file behind the audio support (miniaudio.h) is byte-identical to its upstream release.
If the download itself fails, which shows as "Couldn't download - Download error", Defender is stopping it mid-transfer and there is no file to rescue. Re-downloading only repeats it. Use the zip instead (§8): it is a different file with a different fingerprint, so the verdict on the setup does not apply to it, and it carries a script that installs projectMM exactly as the setup would.
If the file did land and was then quarantined, delete it (Windows Security → Virus & threat protection → Protection history) and download again from the releases page over HTTPS, which re-establishes what you are running rather than trusting a file out of quarantine. Restoring from Protection history works too, but only for a file you downloaded yourself moments before. An exclusion on the install directory would not help, since the flagged file is in Downloads, and a broad Downloads exclusion costs more protection than it is worth.
Either way the durable route is reporting it as a false positive at microsoft.com/wdsi/filesubmission. Microsoft typically clears these within days, and it fixes it for everyone. The verdict attaches to that one build's fingerprint, so a later release is judged afresh.
3. Run the setup¶
Double-click the file you just kept, and the installer opens straight away. Keeping it in step 2 was the trust decision, so Windows does not ask a second time:
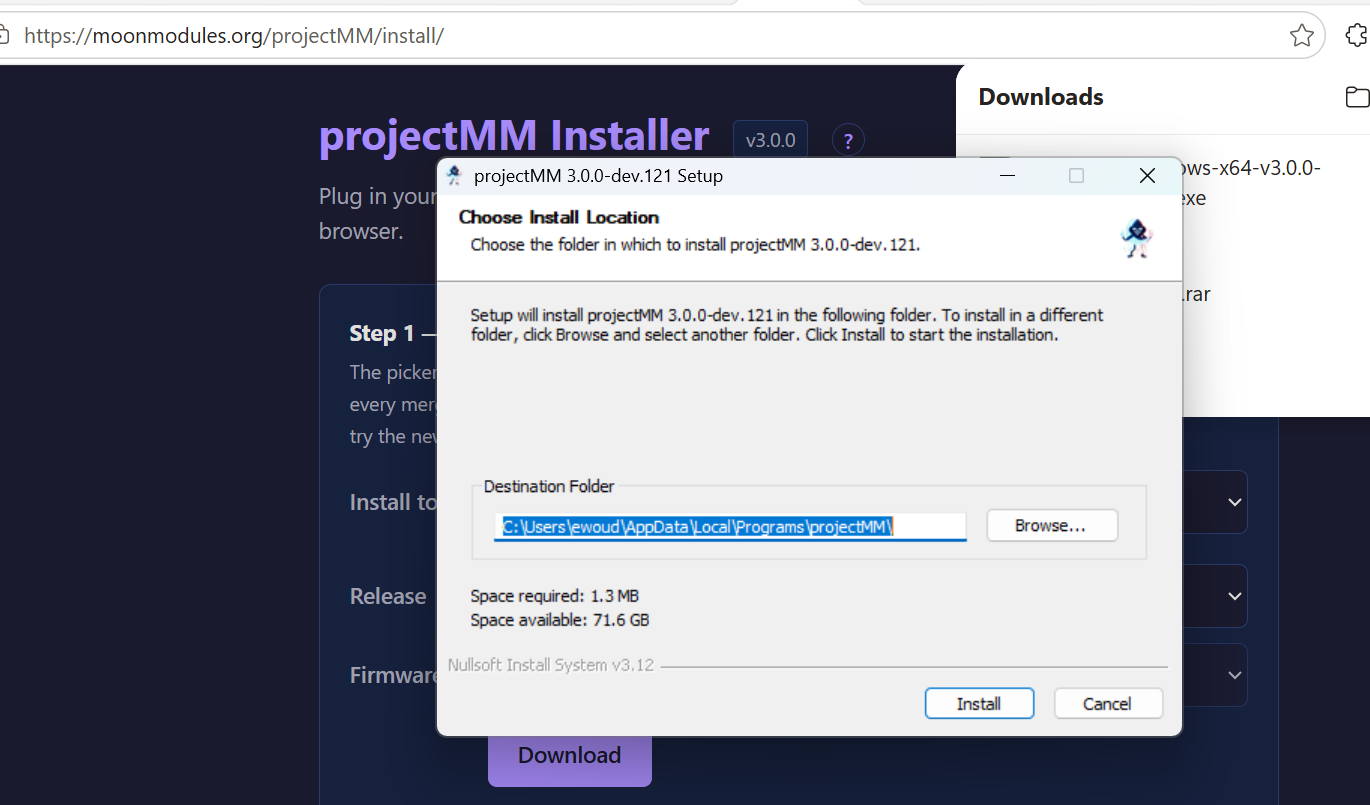
There is nothing to decide here. It installs for your user only, into %LOCALAPPDATA%\Programs\projectMM, which is why it never asks for an administrator password. It needs about 1.3 MB. Click Install.
If a copy of projectMM is already running, the installer stops it before replacing the files. That is deliberate: a running copy holds a lock on its own executable, and the install would otherwise fail part-way.
4. Start it¶
projectMM is now in the Start menu with its own icon. Type projectMM and open it:
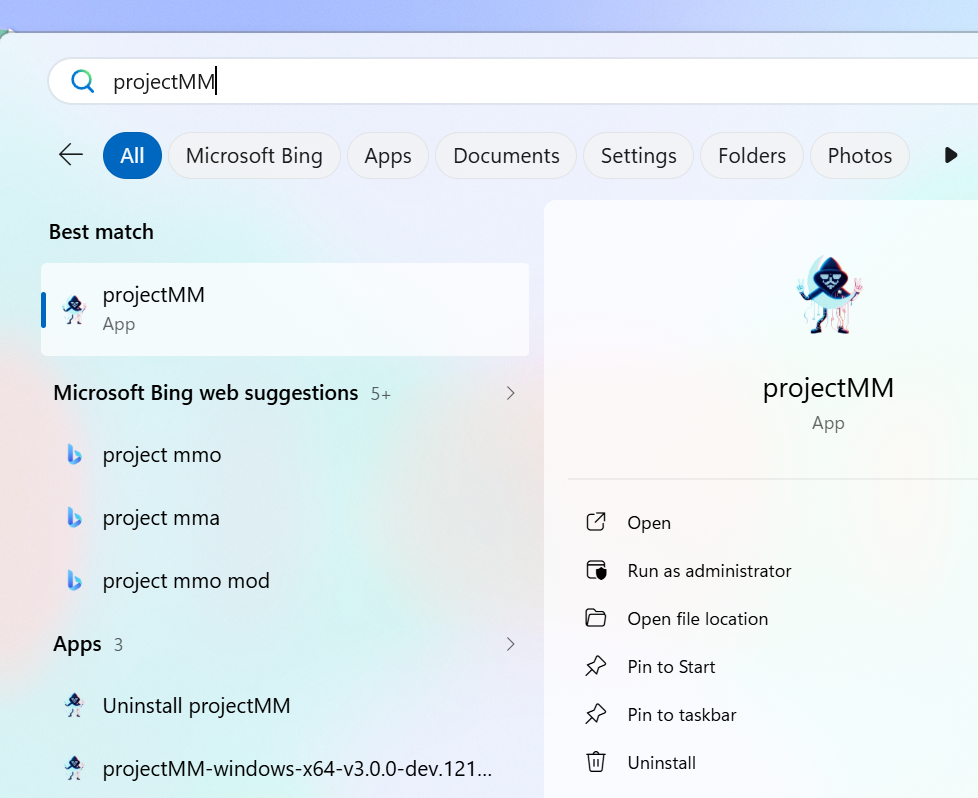
The Uninstall projectMM entry beside it is the clean way to remove it later, and it leaves your settings in place (§6).
5. That is it¶
A console window opens showing what projectMM is doing, and your browser opens the interface at http://localhost:8080/.
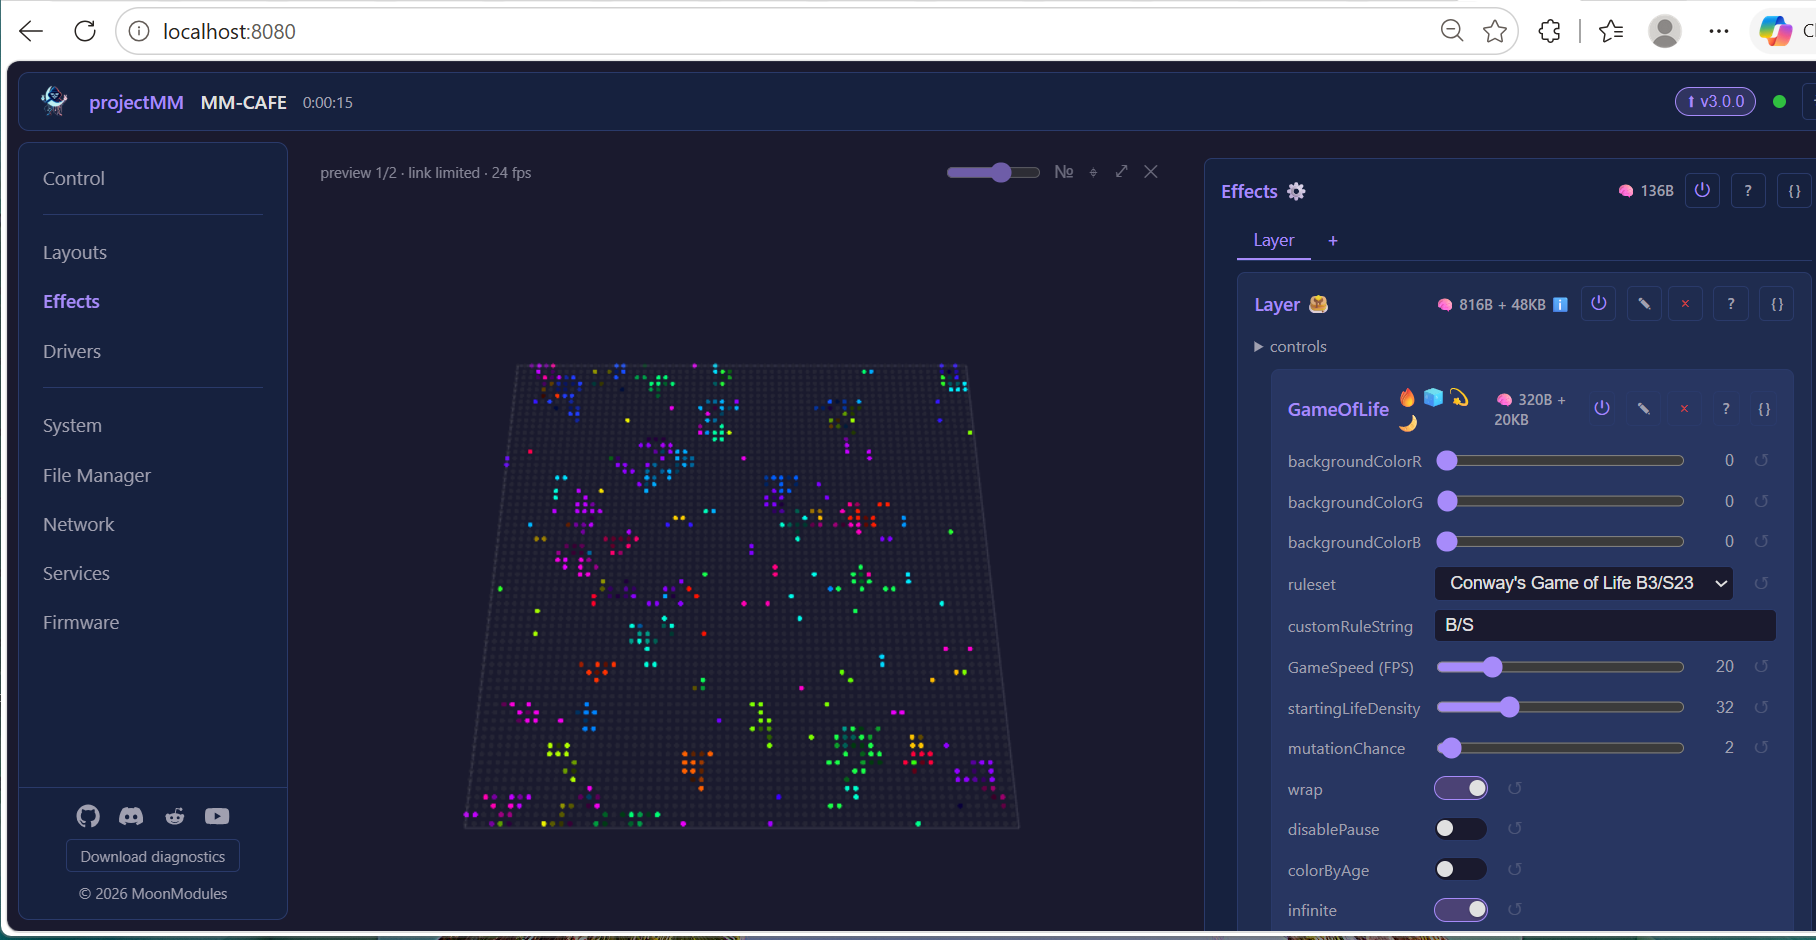
The console window is the application. It shows the log, and closing it stops projectMM. The line that matters on a first run is projectMM is running: http://localhost:8080/; the address printed just below it is the same interface, reachable from your phone or another machine on your network.
On a first install you get a default grid and a running effect, enough to confirm everything works. The screenshot above is not a first install: that machine already had projectMM configured with a Game of Life layer, and the setup left it exactly as it was. That is §6.
From here, How projectMM works explains the Layouts, Effects and Drivers down the left-hand side.
Two options worth knowing: --no-browser stops it opening a browser (for a headless machine), and --port <n> serves somewhere other than 8080.
6. Where your settings live¶
Everything you change is saved automatically, in a folder that belongs to your Windows user rather than to the application:
Note that this is not where the program went. The program sits under Programs\projectMM; your settings live beside it in a separate folder, and that separation is what makes upgrades safe:
- Installing a new version keeps your settings. The installer replaces the program and never touches the settings folder.
- Uninstalling keeps them too. Delete
%LOCALAPPDATA%\projectMMby hand if you want a genuinely clean slate.
Paste %LOCALAPPDATA%\projectMM into the Explorer address bar to open it.
7. Updating¶
You do not have to watch the releases page. When a newer release exists, projectMM lights an ⬆ badge in its top bar, next to the device name. You can see it in the screenshot in §5.
On a desktop the badge opens the release page, not the Firmware card. A device flashed over the network can install a new firmware in place; a desktop cannot replace its own running executable, so updating means downloading the new setup and running it. That is steps 1 to 4 of this page again, and it takes about a minute.
The badge only appears when a release actually ships a build for your OS, and it tracks stable releases. If you are running a latest build, it will point you at the newest stable one rather than at newer latest builds.
Nothing is lost. Running the new setup replaces the program and leaves %LOCALAPPDATA%\projectMM untouched, so your layouts, effects and drivers come back exactly as you left them.
8. The zip: run it, or install it without the setup¶
The releases page also carries projectMM-windows-x64-vX.Y.Z.zip. Extract it first, rather than opening the executable from inside the zip, because Windows unpacks a zip-launched program into a temporary folder it may clear at any time.
It holds the same application plus three files, so it serves two purposes:
Run it in place. Double-click projectMM.exe wherever you extracted it. No Start-menu entry, no uninstaller, nothing written outside your settings folder. This is the one to take on a USB stick.
Or install it properly. Double-click Install-projectMM.cmd. It does exactly what the setup does: copies the program to %LOCALAPPDATA%\Programs\projectMM, adds the Start-menu entry with its icon, registers an uninstaller in Add/Remove Programs, and stops a running copy first so it can replace a locked executable. No administrator rights, because everything stays under your own user profile.
The .cmd is a three-line wrapper around Install-projectMM.ps1, which is where the work happens and which you can read first. Right-clicking that .ps1 and choosing "Run with PowerShell" does not work, and it is worth knowing why rather than being surprised by it: Windows marks every file extracted from a downloaded zip as internet-sourced, and PowerShell's default policy refuses to run an unsigned script carrying that mark. The wrapper exists solely to get past that, and the only thing it adds is permission for its own single invocation.
Two reasons this route exists rather than being redundant with the setup. The script is plain text you can read before you run it, which an installer cannot offer. And when Defender blocks the setup download outright (§2), it is the way through: the flagged thing is the compressed installer, not the application, so the zip is unaffected.
Settings live in the same per-user folder whichever route you take, so the three are interchangeable and share one configuration. Uninstall-projectMM.ps1 reverses the install and leaves your settings alone.
When it does not start¶
| Symptom | Look at |
|---|---|
| The download is flagged and will not open | §2. The choice hides behind the ⋯ and the Delete dropdown, which is easy to miss. |
| A blue "Windows protected your PC" appears when you run it | Only happens if the file reached you without the step-2 prompt, so the trust question waits until you run it instead. Click More info, then Run anyway; the button is hidden until you click More info. |
| It opened and closed immediately | Run it from a terminal so the error stays on screen instead of vanishing with the window. |
The browser shows nothing at localhost:8080 |
Check the console window is still open. Closing it stops projectMM. If another program already uses port 8080, start with --port 8081. |
| Another machine cannot reach it | Use the HTTP server -> address from the log, not localhost. Windows Firewall prompts on first run; it needs to be allowed on your private network. |
| Settings do not survive a restart | The log will say cannot use ... persistence disabled and name the directory it tried. That is the fault, not the saving itself. |
| The installer fails saying a file is in use | A copy of projectMM is running that it could not stop. Close the console window and run the setup again. |
Where to go next¶
- How projectMM works: the interface, and the Layouts / Effects / Drivers model.
- Driving LED panels with a receiving card: turn this desktop into the sending card for an LED wall.
- Install & first light: flashing an ESP32, if you want the same thing on a device.