Lights Control
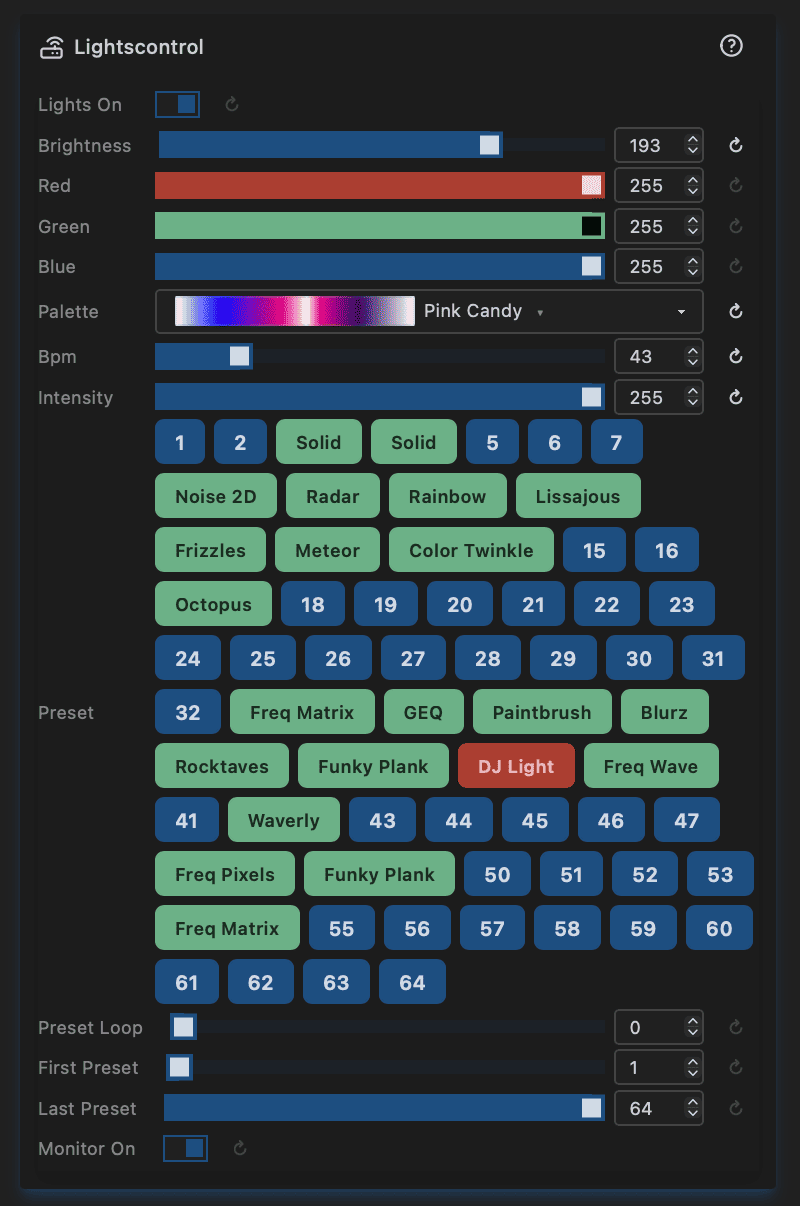
Lights Control is the central command panel for your LEDs. It is also the integration point for every external controller — Home Assistant, DMX, IR remotes, hardware buttons, displays — all talk to the same module.
Power & Brightness
| Control | Type | Description |
|---|---|---|
| On | Toggle | Master switch — turns all lights on or off. Also driven by hardware buttons and PIR sensor (see Hardware pins). |
| Brightness | Slider | Global brightness of the LEDs when on (0–255, default 20). |
When lights are turned off the brightness is set to 0 in the LED driver; the stored brightness value is kept so it is restored when switched back on.
Colour
Three sliders set a global colour multiplier applied to every pixel:
- 🔴 Red — red channel (0–255)
- 🟢 Green — green channel (0–255)
- 🔵 Blue — blue channel (0–255)
Setting all three to 255 (default) leaves effect colours unchanged. Reducing a channel tints the entire output away from that colour.
Palette
A searchable dropdown listing all available palettes, grouped by origin:
| Category | Tag |
|---|---|
| FastLED built-ins | ⚡️ |
| MoonModules palettes | 🌙 |
| MoonLight palettes | 💫 |
| WLED palettes | (no tag) |
The selected palette is the global palette used by effects that reference layerP.palette. See WLED-MM palettes for the full WLED-MM palette reference.
Tip: LiveScript palette files (
P_*.sc) stored on the filesystem appear automatically under the LiveScript category. Palette scripts can define colors statically (usingsetup()) or animate them over time (usingloop()). See Live Scripts for how to write palette scripts and the full list of available functions.
BPM & Intensity
Two global override sliders that broadcast a value to all currently active effect nodes:
| Control | Default | What it pushes |
|---|---|---|
| BPM | 60 | Writes to each active node's speed and BPM controls |
| Intensity | 128 | Writes to each active node's intensity control |
These give you a single knob to speed up or calm down all running effects simultaneously, without opening the Effects panel. Effects that expose a speed, BPM, or intensity control will react; others are unaffected.
Presets
A 64-slot grid for saving and loading complete effect configurations.
Slot colours
| Colour | Meaning |
|---|---|
| 🔵 Blue | Empty slot |
| 🟢 Green | Saved preset — the label shows the first effect name |
| 🔴 Red | Currently active preset |
Interactions
| Action | Result |
|---|---|
| Click an empty (blue) slot | Saves the current effects & modifiers to that slot |
| Click a saved (green) slot | Loads that preset |
| Long-press a saved slot | Deletes the preset |
| Hover over a saved slot | Shows a popup listing the effects and modifiers stored inside |
Note: Presets store Effects and Modifiers only — not Layouts or Drivers. Configure those separately.
Note: Presets save and restore all layers. When a preset is loaded, effects on non-selected layers are cleared first and then rebuilt from the preset file, ensuring a clean switch without stale effects from the previous preset carrying over.
Preset Loop
Automatically cycles through saved presets on a timer.
| Control | Range | Description |
|---|---|---|
| Preset loop | 0–255 s | Seconds between automatic preset advances. Set to 0 to disable. |
| First preset | 1–64 | First slot included in the loop |
| Last preset | 1–64 | Last slot included in the loop |
The loop skips empty slots and wraps around when it reaches Last preset.
Monitor
Monitor On — when enabled, the current LED frame is streamed to the Channels view in the UI. Disable to reduce WebSocket traffic when monitoring is not needed.
Hardware Pins
Pin assignments are configured in IO. Lights Control reacts to the following pin types:
| Pin type | Behaviour |
|---|---|
| Relay — Lights On | Output: driven HIGH when lights are on, LOW when off |
| Push button — Lights On | Momentary press toggles lights on/off (debounced, active-low) |
| Toggle button — Lights On | Any state change (rising or falling) toggles lights on/off |
| PIR sensor | HIGH = lights on, LOW = lights off |
Home Assistant / MQTT
When MQTT is enabled, Lights Control auto-registers as a Home Assistant light entity via MQTT discovery. HA can then control On/Off and Brightness; the device appears under the hostname of the ESP32.
The integration activates and deactivates automatically when MQTT is enabled or disabled in the MQTT settings — no restart required.