Installation
The development environment consists of
-
VSCode
- Platformio IDE
- nodejs
- git
- python
-
GitHub manager
- GitKraken (recommended)
- GitHub Desktop
- No GitHub manager (not recommended)
Summary
- Fork the MoonLight repo and download
- Install VSCode with the platformIO IDE extension
- Open MoonLight in VSCode.
- Build or upload to an ESP32 device.
Fork and Download
Step 1: Create a fork
* Login to your own github account
* Fork: go to [MoonModules/MoonLight](https://github.com/MoonModules/MoonLight/) and press Fork, uncheck 'Copy the main branch only' and press Create Fork. You will be moved to your fork of MoonLight
Step 2: Download the MoonLight repository
-
Use GitKraken or GitHub Desktop (or manually)
- Create a folder to download to: e.g. Developer/GitGub/MoonModules/MoonLight
- Press + / New tab and select Clone a Repo
- Copy https://github.com/
/MoonLight.git and paste in the URL field of GitKraken - Press clone the repo
- The main branch will be checked out per default. Latest development will be done in branches from main, merged back into main when done.
Install and setup VSCode
Step 1: Download Visual Studio Code
-
Windows: download from the Microsoft Store
-
MacOS: Visual Studio download
Step 2: Install PlatformIO IDE
-
In VSCode, search for the extension
-
Install the extension. Please note it can take a while before Configuring project is finished. Do not cancel. Don't change anything in the code yet. Drink a ☕️.
pioarduino IDE
PlatformIO IDE is default but as we are using latest esp-idf, pioarduino IDE is needed when PlatformIO IDE fails.
Step 3: * Open the downloaded MoonLight repository
Build and upload
Step 1: Build
-
Press ☑️ in the bottom statusbar
-
If you compile for the first time it take some time to finish (☕️)
Step 2: Upload MoonLight to an ESP32-device
- Connect an ESP32-device via USB and select the device using the (second) 🔌 icon in the staturbar. See Hardware.
USB-to-serial chip drivers
In some cases, ESP32-devices won't show connected. See USB-to-serial chip drivers at MoonLight Installer
-
Erase the device if it is a new device or the device has not been used for MoonModules before: go to 👽 in the left menu and select Erase Flash
-
Press upload (➡️) in the status bar
-
The firmware is now flashed to your ESP32 device, after flashing the ESP32 device will restart
Serial Monitor
Recommended: Press PlatformIO:Serial Monitor to see the debug information produced (the first 🔌 on the VSCode statusbar)
Step 3: Connect to MoonLight
Before changing code, test if the current download of MoonLight is running fine. Follow the instructions in Connect MoonLight and Setup MoonLight.
-
If you are developing or updating existing MoonLight installations MoonLight might be outdated or not show up correctly in the browser or not even appear. Two reasons
-
Sometimes the latest front-end code is not generated yet (WWWData.h). This is how to set it right:
- Open platformIO new terminal (>_)
- touch ./interface/src/app.html so the build process will be triggered to create a new WWWData.h
- build the project (✔) - if nodejs is not installed (yet) you will get errors. See troubleshooting
- check in your github manager (gitkraken of github desktop) that a new WWWData.h is created
-
An old version is cached in the browser. See UI not showing when installing new version of MoonLight how to solve that.
-
-
A MoonLight device can be accessed via it's IP address or via http://ml-home.local. The latter uses MDNS.
ESP32Devices
IF you want to know which MoonLight (or WLED) devices run on your network, use ESP32Devices to discover the ESP32 nodes on your network
Troubleshooting
supporting tools
- Optionally you need to install git and nodejs, run npm install and make sure python > v3.10 in VSCode.
- Instead of Platformio IDE, the pioarduino IDE extension might be needed in VSCode
Git install
-
When git is not installed on your system, download git and install, restart VSCode and press ☑️ again
-
Windows:
-
MacOS
-
Install git on MacOS
- Install homebrew: will take a while: ☕️
- Install git using homebrew (replace
with your user name):
Python and LZMA
MacOS: Python and LZMA
In some cases LZMA support must be installed
- Run in VSCode / pio shell ([>_])
- python -V should show a version > 3.10 (e.g. 3.11.7)
Install nodejs
nodejs is needed if changes on the front-end (UI) are made (interface folder). On each file change, ☑️ or ➡️ will rebuild the UI using nodejs.
-
Windows: if nodejs is not on your system you will get this error:
- download nodejs if it is not run in admin mode you will get this:
- if this is the case, run an administrator command prompt and run the downloaded .msi file as follows:
- after succesful install of nodejs run ☑️ or ➡️ again. It might be needed to rebuild node_modules and package-lock.json if you see this
- Remove node_modules and package-lock.json - run as administrator if the OS complains!
- Rebuild node_modules and package-lock.json by opening a VSCode shell using [>_] in the statusbar
- If that give errors set execution policies as follows:
- Press run ☑️ or ➡️ again it should now complete succesfully
-
MacOS
- Go to nodejs download
- Get a prebuilt Node.js® for macOS running a ARM64 architecture (for modern Mx MacBooks)
- Choose maxOS Installer (.pkg)
- Next Next Finish Done
- Press run ☑️ or ➡️ again it should now complete succesfully (if needed restart VSCode)
- If still errors, Remove node_modules and package-lock.json, cd interface, npm install and repeat previous step
Ignore DragDropList error
This error will show up in the logging
Just ignore it.-
Check serial output
-
Go to development for further info on developing MoonBase / MoonLight functionality.
Other troubles
- In general: first close and restart VSCode and run ☑️ or ➡️ again.
- python > 3.10: install python (3.11.13) in the VSCode shell (not in a normal os terminal)
- esptool.py not downloaded: deinstall platformIO IDE and install pioarduino IDE extensions (required for support of latest esp-idf 5.5)
- Run everything from within VSCode, close any alternative / external tools which (potentially) access esp32 devices. They can claim resources or send commands to the device which interfere with what we trying to accomplish here.
- If the ESP32 device AP is not showing up in your WiFi list it might be helpful to fully erase the ESP32 device before flashing (VSCode 👽, Erase flash)
- Sometimes the Serial log may show: [5817][W][WiFiGeneric.cpp:1408] setTxPower(): Neither AP or STA has been started. This is from setTxPower in APSettingsService. Delay has been added to prevent this.
MoonLight Installer
4.3.2.1
The device will show in 'Captive portal' mode. Alternatively you can close the captive portal and show it in a browser using http://4.3.2.1
UI not showing when installing new version of MoonLight
If you ran previous versions of MoonLight, the UI might not show up if it has been changed since then. In this case it is needed to reload the UI from the ESP32-device (use http://4.3.2.1)
- Chrome: Command Shift R (Mac) or Ctrl Shift R or Control Reload (Windows)
- Safari: Reload from Origin : Option Shift R
-
After this not all UI elements might be immediately visible. If you see 'MoonLight loading ...' in the browser, just wait a bit (☕️)
-
Sometimes it migh be needed to clear the browser cache:
- Chrome: Delete Browsing data / delete data (caching data)
-
Safari: Empty cache: Menu Develop (enable if not visible in the Safari Menu) / empty caches (Command Option E)
Hostname
The hostname will be used to access your device. E.g. if the hostname is ml-home you can access it using http://ml-home.local
- Restart the device to make the hostname known to your network (go to system status, scroll down and press restart)
- Enter the hostname in your browser e.g. http://ml-home.local
- ESP32-P4-Nano: November 16, 2025: hostname is not working correctly, use IP address instead
Choose driver
FastLED driver is best to start with if you have a normal (ws2812) LED strip or panel.
Choose the Parallel LED Driver if you have more then 4 LED strips or panels or non standard LEDS (e.g. RGBW lights, curtains...). Other drivers (Virtual, Hub,) not supported yet.
In some cases restart the device to make layout changes effective is needed.
Tools used
The installer is powered by ESP Web Tools See also ESP-Web-Tools-Tutorial
ESPConnect on GitHub ESPConnect is based on Jason2866's WebSerial ESPTool.
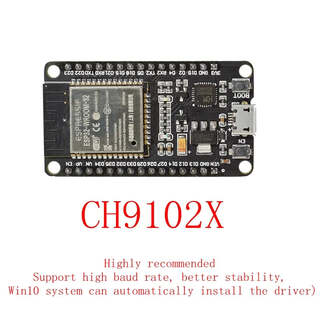
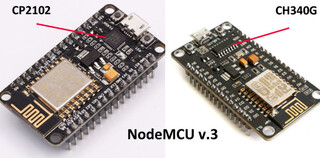
USB-to-serial chip drivers
In case your computer does not recognise your connected ESP32, you might need to install the right USB-to-serial chip drivers. Below are the drivers for common chips used in ESP devices. See the images below to see what chip your ESP32 has.
- CP210x drivers: Windows & Mac
- CH342, CH343, CH9102 drivers: Windows, Mac (download via blue button with download icon)
- CH340, CH341 drivers: Windows, Mac (download via blue button with download icon)